The Art of Animation: Shot Breakdown in the Animseeds Advanced Animation Workshop.
- Animseeds

- May 22, 2023
- 4 min read
Updated: Sep 19, 2025
Animation is not created in a single stroke. Like sculpting, it’s an iterative process of shaping, refining, and polishing until the performance feels alive. In the Animseeds Advanced Animation Workshop, we follow a structured workflow that helps animators craft professional-level shots while keeping the process clear and organized.
Below is a detailed breakdown of the stages every shot goes through in this workshop.
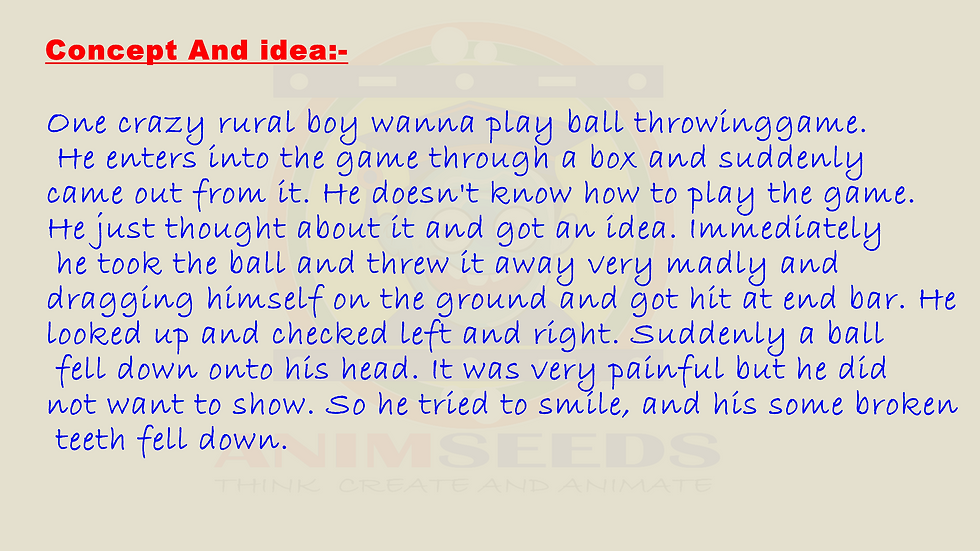
1. Concept and Idea
Every great shot begins with a strong foundation: the concept.
Define the story beat: What is the character trying to achieve in this moment?
Clarify the emotion: Is the performance angry, playful, subtle, or exaggerated?
Consider the context: Where does the shot fit in the sequence? What’s the character’s relationship to their environment and other characters?
Create reference: Either film yourself or study real-life examples to inspire believable motion.
👉 This is where we decide not just what happens, but why it happens.
2. 2D Pass (Planning with Thumbnails / Drawings)
Before diving into 3D, animators sketch out quick 2D thumbnails to explore poses, staging, and timing.
Rough doodles or even stick figures are enough.
Focus on clarity of posing and strong silhouettes.
Map out key storytelling poses (the moments the audience must read clearly).
Plan accents in timing—anticipations, holds, and beats of action.
This stage acts as a blueprint, minimizing guesswork lat
📐 Layout Pass
Before animation begins in earnest, the shot goes through a layout pass—the stage where staging, camera work, and basic movement are established. Think of it as the cinematography + stage setup for your animation.
Camera Setup: Define the shot angle, focal length, and framing to ensure the audience sees what matters most.
Staging: Place characters and props in the environment in a way that supports the story and maintains clarity.
Basic Timing: Rough out character positions and simple movements to test pacing.
Environment Interaction: Block out how characters move through space (walking paths, chair sits, object grabs).
Continuity Check: Make sure the shot flows with previous and next shots in the sequence.
👉 The goal of layout is clarity—establishing a shot that reads well visually and gives animators a solid foundation to work on. Once layout is approved, you can move into the 2D pass or blocking with confidence, knowing the cinematic groundwork is strong.
3. 1st Pass Blocking.
Here, the animator takes the plan and begins building it in 3D animation properly.
Use stepped keys (no interpolation) to clearly present poses.
Focus on key storytelling poses.
Ensure the staging reads well from the camera’s perspective.
Prioritize acting choices, not polish—keep it simple.
At this stage, the shot looks pose-to-pose, almost like a flipbook.
4. Advanced Blocking.
Now the animator starts adding more breakdowns and transitional poses.
Refine arcs (hand swings, body tilts, head turns).
Insert anticipations, overshoots, and follow-through.
Add more nuanced acting choices—micro-expressions, body language tweaks.
Timing is tested more closely to match the performance reference.
By the end of advanced blocking, the shot feels much closer to the intended rhythm and emotion.
5. Spline Primary Pass
This is where stepped keys are converted to splined curves, and the shot starts to move fluidly.
Clean up tangents in the graph editor.
Ensure weight and spacing feel natural.
Maintain the clarity of poses without losing energy.
Focus on primary body mechanics—hips, spine, and overall rhythm.
This stage is often messy at first, but it’s the crucial leap from static poses to believable motion.
6. Secondary Pass & Advanced Spline
Now comes the detail and richness.
Add secondary animation: arms, head, fingers, and overlapping actions.
Refine facial animation: expressions, blinks, and subtle eye darts.
Enhance timing—sharpen accents, add holds, and refine spacing.
Push arcs and fluidity so movement feels organic.
At this point, the character begins to truly feel alive.
7. Polish Pass
Polishing is all about finesse.
Eliminate pops, jitters, or unwanted hitches in motion.
Perfect overlaps, ease-ins, and ease-outs.
Smooth out facial performance, making it read clearly but naturally.
Sharpen eye focus and lip-sync for believability.
Here, the animation should already be working well—it’s about subtle corrections.
8. Final Pass
The last stage is presenting the work at a production-ready quality.
Add final touches to timing and spacing.
Ensure continuity with surrounding shots.
Polish props and environment interactions.
Render for presentation, checking that everything feels cohesive.
👉 The goal here is not to reinvent the shot but to deliver it clean, believable, and emotionally impactful.
Conclusion
The Animseeds Advanced Animation Workshop workflow mirrors what professional studios use: a structured, iterative pipeline that allows animators to explore, test, refine, and polish their performance in stages.
By respecting each stage—from concept to final polish—animators gain control over their creative process while ensuring that the end result is both technically solid and emotionally engaging.
Ready to Take Your Animation to the Next Level?
If this breakdown excites you and you’re eager to dive deeper into the craft of animation, the Animseeds Advanced Animation Workshop is the perfect space to grow. You’ll be guided step by step through industry-level workflows, receive professional feedback, and join a community of passionate animators pushing their skills to new heights.